Wednesday 27 May 2009

Selective Colouring with ImageMagick

Following a recent Photojojo newsletter, I thought I would do some experimentation with black and white. But rather than use Photoshop or GIMP, I decided to use ImageMagick: the command line may seem like more effort at first but it gives more control and you can also put everything in a script for later re-use.

Choosing a good photograph

There are some photographs that come out great as black and white, others that don't. Generally, the best candidates are the ones that look a bit uninteresting in colour, generally because there isn't much colour in them to start with. It's easy to get that sort of shots in London: just go out on a cloudy day and you'll get likely candidates. And so, I shot this picture on Sunday afternoon while on the South Bank:

The Globe Theatre

Although the building is nice, the picture itself is quite dull: there is little colour in it apart from the red flags so it's an ideal candidate for black and white treatment.

Separating the channels

Following the Photojojo article, rather than transform that photograph into grey scale, I started by separating the red, green and blue channels, which is very easy to do with ImageMagick:

$ convert img.jpg -separate img_rgb_%d.jpg

Assuming your original image is called img.jpg, this will produce three images called img_rgb_0.jpg, img_rgb_1.jpg and img_rgb_2.jpg that correspond to the red, green and blue channels respectively:

Red, green and blue channels

The last one, the blue channel, is the best black and white in my opinion as it's got the strongest shadows and lightest sky. Having said that, the red flags in the original photograph were the main spots of bright colour and it would be interesting to bring them back in the black and white shot through selective colouring. So let's do that.

Creating a mask

To selectively colour the flags red in the black and white picture, I am going to combine the original shot with the blue channel image. For this, I need to create a mask that will tell ImageMagick what part of the original shot to use and what part of the blue channel image to use. For the mask, I need a black and white picture that is white where the flags are and black everywhere else: this way, I can tell ImageMagick to use pixels from the original image where the mask is white and pixels from the blue channel image where the mask is black.

Because the flags are red, the idea is to find all the pixels in the original image that are red and no other colour. We can do that by combining the three channel images. Pixels that are a shade of grey, anywhere between black and white will show as the same shade of grey on all three channels but pixels that are of a specific colour, such as red, will be of a light grey in their primary channel and very dark in the other two. Indeed, if you look at the three channel images, the flags show as very light in the red channel but nearly black in the other two. So to create our mask, we can subtract the green and blue channels from the red one.

First, let's subtract the green channel from the red one:

$ convert img_rgb_1.jpg img_rgb_0.jpg -compose minus \
 -composite img_rgb_0-1.jpg

Which produces the following image:

Green channel subtracted from the red one

We can already see the flags pop out of the picture but we can also still see the outline of the theatre. So let's subtract the blue channel from the image we just obtained:

$ convert img_rgb_2.jpg img_rgb_0-1.jpg -compose minus \
 -composite img_rgb_0-1-2.jpg

Green and blue channels subtracted from the red one

That looks good, except that the flags are now light grey rather than really white. It is still a good mask but as the grey pixels will mix both images we use, it will dilute the effect. To ensure that we have a full effect, we need to stretch the contract of the mask to have the background area really black and the flags area really white.

$ convert img_rgb_0-1-2.jpg -level 10%,30% img_mask.jpg

The values given after the -level option specify the percentage of white under which a pixel is considered black first followed by the percentage of white over which a pixel is considered white. There is no real perfect value for those so you need to experiment. In this example, the second value is quite low because we really want most grey pixels to be turned white for a sharp mask.

Stretched mask

You will note that there are some small dots of white at the bottom of the mask. That's slightly unexpected but we'll see in a minute what they are.

Creating the final picture

Now that we have a mask, we need to combine the blue channel image with the original image by applying the mask. This is the simplest use of the -composite operator:

$ convert img_rgb_2.jpg img.jpg img_mask.jpg \
 -composite img_final.jpg

This produces the final image. We can now see that the small dots of white at the bottom of the mask have let out some of the colour of the red flowers on the lamppost, which is a nice extra touch and which would have been forgotten had we created the mask by hand with a drawing tool. Such side effects are typical of such a tool that works on the whole image and can be welcome or not depending on the situation. In any way, it is always possible to tweak the mask manually in a drawing tool before applying it.

Final image

Bootnote

The photo in its original size is now visible on flickr.

Tuesday 26 May 2009

Fractals with Octave: Trigonometric and Exponential Functions

The story so far

In this fourth instalment of this series on fractals with Octave, I'll have a look at the Mandelbrot and Julia sets generated by non-polynomial series. Polynomials are fine but they can be a bit boring so what about introducing a sine or exponential in the mix? The original idea for this came from an excellent set of articles and examples by Paul Bourke.

Sine function

The first series we will use is defined thus:

zn+1=c sin(zn)

That's simple enough and very easy to code in Octave so as our mandelbrot and julia functions now have the ability to take a generating series as argument, it should be no problem. But before doing that, we need to know what value to give to r so that we know when the series diverges and when we can stop iterating. In the very first article, we saw that:

[...] for a given polynomial series, there exists a value r such that if for any n, |zn|>r, then the series diverges.

This only applies to polynomials. The series above is not a polynomial series and its condition for divergence is that the imaginary part of zn be greater than 50. That doesn't work well with our current code that expects a simple integer. We could replace the integer parameter expected by the mandelbrot and julia functions with a function handle but that would make their usage more complex when using polynomial series. Luckily, we can have the best of both worlds because Octave uses a weakly typed language: the type of a parameter passed to a function is not specified in the function definition, meaning that you can pass anything, you just have to hope that it is what the function expects. While this can be seen as a drawback for long and complex programs where validation can be cumbersome, it is actually a useful feature for a high level language like Octave where functions tend to be short. To make it work, we need to modify the mjcore function so that it can accept a function handle or an integer as its fifth parameter and act accordingly. For this, we will use the Octave isa built-in function to identify whether the parameter is a function handle. Here's how to modify the mjcore function:

mjcore.m

function M=mjcore(z,c,niter,f,r)
  if(isa(r,"function_handle"))
    rf=r;
  else
    rf=@(z) abs(z)<r;
  endif
  M=zeros(length(z(:,1)),length(z(1,:)));
  for s=1:niter
    mask=abs(z)<rrf(z);
    M(mask)=M(mask)+1;
    z(mask)=f(z(mask),c(mask));
  endfor
  M(mask)=0;
endfunction

That's all great and now we should be able to create our first sine Mandelbrot. We need to make sure that we reverse the comparison operator in the last parameter because our code is built so that we provide a convergence condition rather than a divergence one:

octave-3.0.1:1> Msin=mandelbrot(-1.2*pi+0.9*pi*i,1.2*pi-0.9*pi*i,
> 320,64,
> @(z,c) c.*sin(z), @(z) abs(imag(z))<=50);
octave-3.0.1:2> imagesc(Msin)

And we end up with... a dark blue rectangle, not quite what was expected. This is because in this form, the value of z0 is 0, therefore sin(z0) is also 0 and so is c sin(z0): the series is always null and never diverges. To correct this, we would need to have z0=c, that is initialise the series to the values of c. But if we do that in the code of the mandelbrot function, it will break some of our previous examples. That is unless we can specify a special value of z0 to the mandelbrot function to force it to initialise to z0=c. A similar trick to what we did for r above can do that: if the given parameter is the special string "c", initialise to c, otherwise assume the parameter is an integer and initialise as before. Here is the modified mandelbrot function:

mandelbrot.m

function M=mandelbrot(cmin,cmax,hpx,niter,
                      f=@(z,c) z.^2.+c,r=2,
                      z0=0)
  vpx=round(hpx*abs(imag(cmax-cmin)/real(cmax-cmin)));
  z=zeros(vpx,hpx).+z0;
  [cRe,cIm]=meshgrid(linspace(real(cmin),real(cmax),hpx),
                     linspace(imag(cmin),imag(cmax),vpx));
  c=cRe+i*cIm;
  if(strcmp("c",z0))
    z=c;
  else
    z=zeros(vpx,hpx).+z0;
  endif
  M=mjcore(z,c,niter,f,r);
endfunction

After that modification, we can run the mandelbrot function again with our new special parameter:

octave-3.0.1:1> Msin=mandelbrot(-1.2*pi+0.9*pi*i,1.2*pi-0.9*pi*i,
> 320,64,
> @(z,c) c.*sin(z), @(z) abs(imag(z))<=50, "c");
octave-3.0.1:2> imagesc(Msin)

Octave should open the Gnuplot window and display an image similar to this:

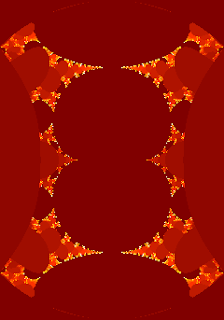
Sine Mandelbrot Set

Sine Mandelbrot Set

We can also generate a sine Julia set without any change to the julia function:

octave-3.0.1:1> Jsin=julia(-2.4*pi+1.8*pi*i,2.4*pi-1.8*pi*i,
> 320,64,1+0.5i,
> @(z,c) c.*sin(z), @(z) abs(imag(z))<=50);
octave-3.0.1:2> imagesc(Jsin)

Sine Julia Set

Sine Julia Set

Cool stuff! So let's have a look at other non-polynomial functions and their output.

Cosine

This series is defined by:

zn+1=i c cos(zn)

And has the same convergence condition than the previous series.

octave-3.0.1:1> Mcos=mandelbrot(-1.2*pi+0.9*pi*i,1.2*pi-0.9*pi*i,
> 320,64,
> @(z,c) i.*c.*cos(z), @(z) abs(imag(z))<=50, "c");
octave-3.0.1:2> imagesc(Mcos)

Cosine Mandelbrot Set

Cosine Mandelbrot Set
octave-3.0.1:1> Jcos=julia(-2.4*pi+1.8*pi*i,2.4*pi-1.8*pi*i,
> 320,64,0.55+1.195i,
> @(z,c) i.*c.*cos(z), @(z) abs(imag(z))<=50);
octave-3.0.1:2> imagesc(Jcos)

Cosine Julia Set

Cosine Julia Set

Tangent

This series is defined by:

zn+1=c tan(zn)

And uses the same convergence function as a polynomial with the default value of r.

octave-3.0.1:1> Mtan=mandelbrot(-1.4+1.4i,1.4-1.4i,
> 320,64,
> @(z,c) c.*tan(z), :, "c");
octave-3.0.1:2> imagesc(Mtan)

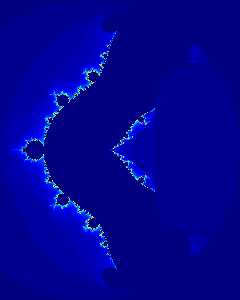
Tangent Mandelbrot Set

Tangent Mandelbrot Set
octave-3.0.1:1> Jtan=julia(-1.4+1.4i,1.4-1.4i,
> 320,64,(1+i)*sqrt(2)/2,
> @(z,c) c.*tan(z));
octave-3.0.1:2> imagesc(Jtan)

Tangent Julia Set

Tangent Julia Set

Exponential

First, let's multiply the exponential using the following series:

zn+1=c exp(zn2)

This series uses the default values for r and z0.

octave-3.0.1:1> Mexp1=mandelbrot(-1.4+2i,1.4-2i,
> 240,64,
> @(z,c) c.*exp(z.^2));
octave-3.0.1:2> imagesc(Mexp1)

Exponential Mandelbrot Set #1

Exponential Mandelbrot Set #1

Then, let's add to the exponential using the following series:

zn+1=exp(zn2)+c

This series also uses the default values for r and z0.

octave-3.0.1:1> Mexp2=mandelbrot(-2.2+2i,1-2i,
> 240,64,
> @(z,c) exp(z.^2).+c);
octave-3.0.1:2> imagesc(Mexp2)

Exponential Mandelbrot Set #2

Exponential Mandelbrot Set #2

Cactus

Finally, let's draw a cactus using the following series:

zn+1=zn3+(z0-1)zn-z0

This series uses the default values for r and the special value z0=c.

octave-3.0.1:1> Mcactus=mandelbrot(-0.8+0.6i,0.8-0.6i,
> 320,64,
> @(z,c) z.^3.+(c.-1).*z.-c,:,"c");
octave-3.0.1:2> imagesc(Mcactus)

Cactus Mandelbrot Set

Cactus Mandelbrot

Next

Next in this series, we will look at a fractal called the Burning Ship.

Monday 25 May 2009

Lloyds TSB phishing scam

I just received an email which claims to come from Lloyds TSB. As I am not a customer of the bank, it is obviously a scam. I've been looking on the bank's web site in an attempt to report it to them but there doesn't seem to be any email address advertised where you can do so. There are a couple of telephone numbers for their customers but that's it. Surely, it would be useful to them to have copies of those emails, if only to know they exist and to warn their customers. But it seems they are not interested. Maybe it's a good thing I don't bank with them then.

Photos from Peru

I came back from Peru a week ago and spent a good part of last week tweaking and cleaning the best of them. They are now visible on flickr. The tweaking and cleaning I do on photos is very simple and consists in:

  • stretching the contrast if required;
  • removing fluff and dirt mark left on the lens or the sensor;
  • very occasionally, cropping the shot.

So no heavy Photoshop (or in that instance GIMP) processing, just the bare minimum.

Thursday 7 May 2009

It's all relative

I'm in Peru. We just spent a couple of days around the Cañon de Colca, one of the deepest canyons in the world. The place where we stayed last night, Chivay, is at 3700 metres above sea level and on the way there we stopped at a viewpoint that was 4900 metres above sea level, higher than Mont Blanc. The area around Chivay and the canyon is lush and green and if it wasn't for the thin air, you'd easily forget that you are at an altitude that is higher than most of the Alps' ski resorts.

Nobody told the locals either, as explained by one of the girls in the group this morning: she asked the landlady of the hotel where she stayed overnight whether she kept llamas or alpacas, to which the landlady replied "we don't do that here, only in the mountains". That'd be the steep bits above 4000 metres that we see in the distance then.

Bootnote

This was written on the bus between Chivay and Puno yesterday and uploaded today.

Friday 1 May 2009

ExifTool on Ubuntu

A while ago, I blogged about installing ExifTool on Ubuntu. There's actually a much simpler way to do this. ExifTool is part of the standard packages directly available from the Ubuntu repositories so it can be installed in one line using apt-get, no need for that make malarkey I mentioned last time:

$ sudo apt-get install libimage-exiftool-perl

Et voilĂ , ExifTool installed and ready to go!